Method
1
After searching
for many months I finally broke down and
purchased
a cross from the traditional Irish-American gift shop. I took
it apart and found the simple secret of the
design.
The process does wonderful things for busy fingers
and
is great with story telling!
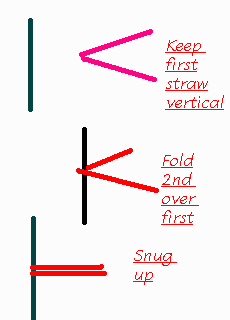
1.
Find 9 8-12 inch rushes, swizzle sticks or drinking
straws and 4 small
to medium sized rubber bands.
2.
Hold one of the rushes/straws vertically.
3.
Fold a second straw in half horizontally
over and at a right angle over
the center of to the first straw with the second straw
projecting to the right.
Snug the inside of the bend right up to the first straw
at
its center.
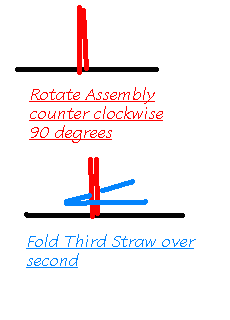
4.
Grasp the center overlap tightly between thumb and fore-finger.
5.
Turn the two straws held together 90 degrees counter clockwise
(left)
(the two ends of the second straw will be projecting upwards.)
6.
Fold the third straw in half over both parts of the second straw horizontally
from left to right and snug the inside of the fold up against the
center
and the second straw. Hold tight.
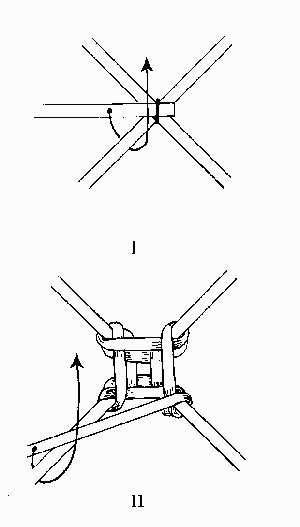
7.
Holding the center tightly! Rotate all straws
(the entire assembly) 90
degrees counter clockwise. (left)
8.
This time the bottom half of the first straw will be projecting upward.
Fold a new straw in half over and across all straws projecting upward.
9.
Snug the straw tightly against the center and against the vertical straws.
10.
Holding the center tightly rotate all straws (the entire assembly) 90 degrees
Counter clockwise.
11.
Fold a new straw in half over all vertical straws from left
to right and
snug up to center and to the right.
12.
Repeat the process of rotating all straws (the entire assembly) 90
degrees
to the left and folding the new straw over until all straws
have been used.
Remember: Hold tight to the center.
13.
When you get to the last straw snug all straws together and instead of folding
the last straw over the straws place its ends under the straw opposite one under
each side. This will lock the straws in place.
14.
Secure the last arm of the cross with a rubber band or if using rushesplatted
straw or string. Then secure each other arm.
16.
You may paint the drinking straws but be careful as wet paint will dissolve the
thin paper covering. Place rushes on a flat surface to dry. You may
wish to seal the rushes when dry with a paint of your choice.
How did you do?
Let me know send e.mail with
your comments! Here
To the top! |